Wednesday, November 27, 2019

2-Wire reedmaking: finishing blanks


Thanks to Shawn Seguin (SS) for helping to articulate and organize our thoughts and concepts
on this style of reed-making.  Thanks to Eryn Oft for the encouragement to get this process
documented and shared with our whole community!


Step 1: Watch my YT video which is lengthy but also filled with a lot of information on each step of the finishing process.


Step 1: Watch my YT video which is lengthy but also filled with a lot of information on each step of the finishing process.

Step 2: Clip the tip - 31 mm from top wire

  • SS - finished at 27 - 28, starting at 29 - 30, form tip, get general sense of intonation
  • EC - clipping to adjust tuning, start at 29 mm from tip to top of wire, shorten as needed


Crow and play the reed on your bassoon right after you clip the tip - you’ll be surprised!  Keep crowing and playing on your bassoon after each step (especially on your first several attempts) to best appreciate how quickly the vibrations are freed up.  Also, by crowing and playing more frequently, you will avoid over thinning the tip.  This is integral to the reed style which is generally thicker overall and in the ratio from the collar to the tip.  

Step 3: Divide the reed into 3 equal sections:

  • Zone 1 (tip) - overall response, pitch
  • Zone 2 - “Feel of Reed,” mid-range clarity
  • Zone 3 - Bottom octave response


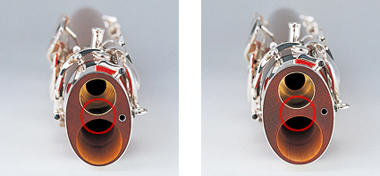
Step 4: (in the video, I have combined steps 4 & 5 into 1 step - thinning Zone 1 as a whole) Release vibrations by removing cane from Zone 1 & Zone 2 channels (shaded area seen in picture)
                                     

  • Crow the reed before and after you do this to feel how much difference taking cane from this very small area releases vibration.
  • SS - “Feel of reed” is how much embouchure pressure is required at the point where your lips connect with the reed (Zone 2)
  • When removing cane from Zone 2 channels keep in mind that you are not creating channels your are releasing vibration.
  • This reed style is about vibration!


Step 5: Thin the tip (shaded area in pic, 1 mm in height) this the point of drop off and can be done several ways
                                             

  • Sanding plank - hold the reed at a 45 degree angle and apply pressure to the middle of the tip to assist in evenly removing cane straight across
  • Knife - moving straight across the tip, remove cane until you no longer hear the popping sound of the knife against plaque (or the popping is significantly less)
  • File - straight across


Step 6: Thin Zone 1 with a superimposed “anchor” (drawn on reed in the YT video)

Center is the heaviest, rail next heaviest, bottom and center of rounded area is the thinnest
                                       

Step 7: Using a dial indicator, balance the aperture from center to rail and between blades, top and bottom

  • (SS) Corners relate to the rail, not the tip, and should be thinned to create a taper from collar to tip in the rail
  • (SS) Rail has a ratio to the spine
  • We see the manifestation of a heavy rail at the tip, we address the manifestation (“warped tip”) by addressing the taper of the rail as a WHOLE


Step 8: Release final vibrations (third crow, bottom octave response) 

  • Removing cane from Zone 3, be sure to blend all the way off the tip
  • Use less pressure (if using a file or sandpaper) as you approach the tip
  • Avoid removing cane from the center of the tip
  • Rotate the file out towards and off the corners


Step 9: Final adjustments

  • Round the tube by crimping between the wires to darken the sound as need
  • Clip the tip if pitch remains flat
  • Sand down the rails if the sound is too wild


Step 10: Enjoy your new reed which (hopefully) finished relatively fast and easy!


I'm certain there is more I can include on this step-by-step manual. Please leave comments to let me know what is unclear so I can make updates. Happy reedmaking, friends!

Sunday, June 30, 2019

2-Wire reedmaking: first steps --> blank


This post is written in collaboration with the marvelous Eryn Oft!  Be sure to watch her accompanying video.


May 17-19, 2019 I attended the University of Iowa, Advanced Reed-making Workshop with Italian bassoonist, performer, educator, and tool-maker/owner of Andante e Rondo, Giorgio Versiglia.  This remarkable workshop was hosted by: Benjamin Coelho and Eryn Oft.


If you aren't familiar with these three wonderful bassoonists, click on those links and learn about their work!  


For the duration of this post: 
GV = Giorgio Versiglia, AeR = Andante e Rondo

I have been playing on GV's style of reeds exclusively for the past month.  It has been wonderful and proven to me that this is an effective and efficient style of reedmaking.  I have also learned that applying GV's principles to your current shape and profile will also yield positive results.  I have used the AeR tools that are specific to the GV process but there are also fundamental principals which can be applied to the materials you currently use.  I have found these principles to be quite different from how I have made reeds previously.  Thus far in my experience, applying those principles to my own GSP have vastly improved my reed quality with a shorter finishing time.  

Photo credit: Eryn Oft
What you need:
  • Gouged, shaped, profiled cane -  GV's cane from AeR - or any that you already have.  I have applied GV's style to Reiger 1, Rieger 1A, Fox 1, and Fox 3, all with Gonzalez tube cane, with excellent results.  I have also used AeR cane (with GV's specific shape and profile) which I also highly recommend.  
  • 24 gauge soft brass wire - this link will take you to the specific wire used by GV.  I have been using my preexisting stock of 24-gauge wire which you will see in my images and videos.  
Photo credit: Eryn Oft
  • forming mandrel, AeR forming mandrel
  • holding mandrel, AeR mandrel
  • flat diamond file, AeR file
  • calipers                                                                                                                                                                             
  • Tip cutters/clippers (mine pictured below), AeR clipper (check these out, very different) 
                                       
  • Cotton Thread
  • Titebond II Wood Glue (available on Amazon)
Photo credit: Eryn Oft


DAY 1
       

1. Begin by beveling the entire length of the tube.  Using the diamond flat file, held vertically, file in an up-and-down motion ensuring you do not over bevel (creating gaps on the side of tube) but adequately removing any angle which would prevent the tube from sealing.  

Photo credit: Eryn Oft
2. Clip one side of the tube 27 mm from collar to butt.  GV clips the tube one half at a time.  Clipping the tube at once risks cracking into the blade.  

3. Fold the cane.

4. Clip the opposite side of tube to match the length.  You may still need to sand the butt of the tube to make it perfectly even.  Wait to sand until after the reed has been wrapped.  


You are looking at my personal notes from the workshop.
                                         
5.  Using 24 gauge, soft brass wire, wrap the the top wire 3x's.  Position the wire 32 mm from the fold.  Measure from the fold to the top of the wire.  I have used 21 and 22 gauge wire that I already had in stock.  I even had a little 24 gauge craft wire from my local crafting store.  I have to say, to yield the best results, order 24 gauge wire from RJ Leahy, product code BWI-020SSP1.  

6. Subdividing the tube into 3 sections, cut 2 scores in the outer sections.  This can be done with an exacto knife or traditional reed knife.  You will run the knife up into the tube allowing the score to travel to the first wire but your knife will not need to travel all the way to top wire.  If you have placed the top wire tight enough, the score will not travel into the blade. 

Photo credit: Eryn Oft
7.  Insert forming mandrel by twisting the reed onto the mandrel. Press the tube around the mandrel using your fingers (not crimping with pliers).   

You can purchase the AeR forming mandrel (and other tools) which are reasonably priced.  You can also use a 1/16 nail punch.  You can find these in sets or just the singular nail punch on Amazon.  The prices are all pretty inexpensive.  

1/16 (2/32) nail punch 


Photo credit: Eryn Oft

8. Remove the reed from the forming mandrel, press tube back together, cut 2 more scores into the middle section in the same manner as before.  You will now have 6 scores approximately 1 mm apart.  

9.  Place reed on holding mandrel by twisting the reed down to the marked line (if you are using the AeR holding mandrel). Wrap the bottom wire 3X's, placing it 6 mm from the butt.  Measure 6 mm from the butt to the bottom of the wire.  

There is an error in my notes regarding whether to tighten down the top wire at the end of the first day or not.  Eryn's notes (and pic) show a top wire that is tightened down.  
Day 2


1.  Now that the cane is fully dry, you can tighten down the wires.  If you are using the AeR holding mandrel, keep tightening the bottom wire until the reed sits 8 - 10 mm above the marked line.  In my experience with these reeds, this can be almost impossible to do without breaking the wire if you are not using the RJ Leahy 24 gauge wire.  Do your best with the wire you have.    

2.  Wrap with cotton thread and Titebond II wood glue.  I have been using my typical nylon thread with Duco cement which will not alter the results but it will narrow the tube as it dries.  As Eryn mentions in her video, the Titebond glue takes longer to dry and becomes tacky when soaked in water even after the initial drying of the glue.  I noticed that for the reeds tied with cotton/wood glue, I only soak/wet the blade and avoid the tube/wrap getting wet as much as possible.  In general, I am soaking these reeds for only a fraction of the time as compared to how much soaking I have done in the past.  

*Every stage of the GV process requires very little soaking:
  • GSP cane before forming the tube, soak only a few minutes.  
  • Placing the blank on the profiler can be done dry.  
  • Working on the reed needs just a few dips of the blade, leaving the tube completely dry through the finishing process.
  • Playing on the reed can almost be done completely dry (especially impressive as I live in the mountain west at 4,800 feet).  Dipping the blade into water and then letting it sit for a minute is sufficient preparation for playing. 
3.  Place blank on the AeR tip profiler to finish and it will be ready to play requiring, if any, only minor adjustments.  Pictured below is the tip profile created by the AeR profiling machine using template #7002.

*I have adjusted and am using my Rimple tip profiler (adjusted to leave on more cane than my previous setting) to create a ready-to-play reed.  Not the same shape of profile as the AeR but the process is still successful.  
Andate e Rondo Tip Profiler template #7002

4.  Ream the tube for a perfect bocal fit.  highly recommend the AeR reamer!  It is by far my favorite reamer to date (Fox, Riegers, Miller 2X wet/dry).  In addition to a clean/consistent cut, the reamer has a stop that can be adjusted with an Allen wrench for a precise ream every time.  If you use the AeR tip profiler be sure you do not ream the reed prior to tip profiling as this may cause the reed to slide around on the mandrel and create an uneven tip.

The clippers used by GV and sold on AeR website, as indicated above, are from a Japanese maker.


Sunday, June 23, 2019

Giorgio Versiglia! Eryn Oft! REEDS! Oh my!

Oh my gosh!  
Collab with Eryn Oft is happening!  

#womencollaborators
#bassoon
#dreamscometrue

We are talking reeds, reeds, REEDS!  
Specifically everything we learned from Giorgio Versiglia.  


First - watch Eryn's video right now.


Next - Come back here on June 30th to get ALL the
details for making these reeds on your own.


Monday, May 20, 2019

Double Reed Dish: A Reflection


We are truly fortunate to have members of the Double Reed community who care enough about the progress of all to ask hard questions, share the tough moments, and take an honest look at the challenges we all face in a thoughtful, nurturing, and positive forum.


This post will share my reflections inspired by the Benjamin Kamins episode of Double Reed Dish which exposed several crucial points for professional reflection.


We all know exactly who Benjamin Kamins is and, while there are many ways to describe his contributions and legacy to our community, I would personally describe him as the gentle force behind one of the winning-est studios in the country currently.*  National auditions, competitions – his students win with a stunning amount of frequency.  

*Completely anecdotal statement, no actual footwork completed to prove this statement.

I have observed masterclasses led by Mr. Kamins, reed making workshops, even auditioned for his studio way back in 1999.  I've seen him perform, listened to his albums, and took advantage of an opportunity to pick his brain about DMA programs when he randomly sat next to me at a MQVC concert  He’s unfailingly kind, indefatigably positive, and intimately aware and wise regarding every aspect of this crazy bassoon career.

There were many moments in his recent interview with the Double Reed Dish that were worthy of cross-stitch and framing.  Such as this Zen proverb:

“Before enlightenment, chop wood, carry water. After enlightenment, chop wood, carry water.”

I want to focus on a few as they relate to my own much needed, mid-career catharsis.

1 - Regarding winning his first job at the age of 19, he said, “I got lucky.”

2 - Regarding his career moving forward from that point, summarizing audition wins and losses, “I still felt like a failure in my career into my mid-40’s.” 

3 – Trying to win the principal bassoon spot in the "God Philharmonic” – which he didn’t achieve – and learning instead to bloom where he had been planted in Houston. 

The honesty and perspective with which Mr. Kamins speaks is a salve to the mid-career musician soul.  It sparks reflection on subjects we don’t talk about nearly enough and no amount of mentoring ever makes easier.  The idea that you can work your entire professional life as a musician and still feel like you haven’t accomplished your dream, you haven’t gotten “there,” which Mr. Kamins was quick to declare, it doesn’t exist.  

We spend so much of our energy looking at the careers of a few great performers/pedagogues and think, I want to get “there.”  In pursuit of “there” we push ourselves through auditions, jobs, moves, endless hours of practice, reed-making, networking.  For those who “Do The Work” with discipline and consistency, a career is built along the way which, for many, may not look anything like the “there” they had imagined for themselves.

I have been really fortunate as a working musician my entire adult life even with a two year mom-sabbatical.  I have been a military musician, a salaried orchestral musician, touring chamber musician, founder and board member of a non-profit, adjunct/visiting/tenure-track professor, and, and, and…

…but I still fight that little voice that pokes at me, “Too bad you never won principal bassoon of the God Philharmonic.”

Which is one of the reasons I found myself at the Seattle Symphony associate principal audition in March.  I was sent on my way after five excerpts in the prelim round.  I haven’t advanced out of prelims since the Naples audition...whenever that was...maybe c. 2014...I mean, YEARS AGO My career success rate for auditions hovers around 10%.  Despite this, my transition into higher education has placed me in a position that easily provides the final resting place for me professionally.  

Woo-hoo!  Right…?

Except, this year, ensconced in my tenure process, my mind keeps running the following script over and over:

This is it!  
I’m there!  
This is it!
Woo-hoo!  
This is it!  
THIS IS IT!
This is it?  
I’m here for how many more years?  
I am going to be here for basically the next 30 years of my life?
Wait a second.
This is new.
Staying put.
Never done this before.
ENTER: doubt, second-guessing, but “what if” mind-set, plans to keep taking auditions.

4 – "While you still have the fire in the belly...and you still have the dream...you should keep going and working toward that dream." How long do you push, when do you settle down?  We really do have permission to do both, my friends!  Imagine that!    

5 - "Just do the work!  It's the only thing we have!" and I would add, find a way to have joy in that work.  You have to love the process of discovery and improvement and you absolutely have to love reed making.   

It steels the heart to hear a masterful player and teacher like Benjamin Kamins share his experiences with the doubts we all feel and the hopes to which we all hold.  

The work of learning how to live in peace and gratitude while simultaneously pushing forward to be your best self, your best bassoonist is not easy!  Many of us get folded up into the dark corners of our brains and take time away from seeing the beauty of the lives we have created.

We have been taught, explicitly and passively, that some jobs, some careers, are just better or more impressive than others.  I'm not sure this has come from a point of malice but we have all listened to bitter, cynical musicians deplore lost auditions and missed opportunities - holding to the thought that to be “there” is better than to be “here.” But let's follow Mr. Kamin's lead to teach and share a new message: celebration of the careers we DO achieve.

Thanks Double Reed Dish for creating a space for a new conversation among musicians!

Cheers for celebrating the many professional bassoonists who wake up each day to perform and teach in their communities, the local Master Bassoonists!  How fortunate we all are! May we never diminish our achievements by calling a career a failure because it looks different from the careers of others or different from what we set out to do at the inception of this journey!

Cheers for bassoon gratitude and a community that is working to tell the story of success and abundance in every corner of our bassoon world.

Saturday, February 23, 2019

Six bassoons later: what I've learned, where I'm at.


"Sometimes you do things in life just to figure out what you don't want to do in life."  - My Dad


The same principle can obviously be applied to trying bassoons in the pursuit of finding The One.  

All of the instruments I have trialed have strengths and weaknesses.  For the price you would pay for each of them, my feeling is that they are all priced quite reasonably and all sit in the $17,000 - $24,000 range.  

The Moosmann 222-CL, Leitzinger Model II, and Kronwalt are all solid instruments.  If you are in the market for a bassoon be sure to try these bassoons - they have a lot to offer!  However, they are not right for me and the goals I have set for this process.  They are also all thick wall bassoons.  

This has been the most important realization I have made during this process:  The instrument I need for the sound I desire and the type of playing I do falls within the capabilities of a "thin wall" instrument: the Yamaha 811 & 821 and the Moosmann 150E have presented as the best options for my needs.

Thin wall bassoons are typically associated or  modeled after the much sought after Heckel pre-war sound.  Not every manufacturer carries or even identifies with thin or thick wall bassoons.  Also, these identifiers are relative and vary with regard to actual measurements.  However, there are clear differences in how these instruments play - whether the manufacturer chooses to identify them as thick/thin or not.

Thin Wall vs. Thick Wall

Below is a great graphic and explanation from the Yamaha website:

A bassoon with walls of regular thickness has a rich sound, with a high degree of flexibility that can easily produce sound with a soloistic, song-like and expressive quality. More power is required when playing a bassoon made with heavy, thick walls, but its sound has a uniquely solemn, dark quality, and is particularly suited to orchestral performances.
Standard wall thickness YFG-811 (left), and thick wall YFG-812 (right)


Flexibility 

What on EARTH does this word mean to bassoonists and why do we use it to describe the abilities of instruments that are very different from each other?

Flexibility of pitch

Flexibility of sound

Here is what I have learned after reading and re-reading descriptions of these instruments by the manufacturers, vendors, and players then pairing those thoughts with my own experience playing these instruments and chatting with other players as well:

Flexibility in a bassoon is the ability of the instrument to make changes in pitch with ease.  For example, in chamber music, if the player wants to match quickly to another's tendency, can the pitch be adjusted quickly and with ease.  It does not refer to the overall pitch being unstable.

Flexibility also refers to the instrument's ability to play in different timbres (bright or dark) across all ranges and dynamics.  

When you read manufacturer's descriptions they use flexibility to describe both thick and thin wall instruments.  This is partly why it's confusing to a buyer, novice or experienced.  

I think these concepts have been elusive in my own understanding because I play a Fox 601, thick wall bassoon, and I do not find it flexible in these ways.  Concepts of flexibility are foreign (even confusing) to me because I haven't experienced it in 10 years of playing on a thick wall instrument.  The thick wall models are built for power, projection - read every instrument description from every manufacturer for a thick wall instrument - and consistency (wherever it may lay, it's not budging), a bassoon built for the large orchestra.

From the Fox website, notice what word is missing from this description of the 601 model:

THE FOX MODEL 601 WAS FIRST OFFERED BY FOX PRODUCTS IN 1991. DESIGNED TO PROJECT A LARGE, DARK TONE TO MEET THE NEEDS OF SOLOISTS AND ORCHESTRAL PLAYERS, IT WAS THE FIRST FOX DESIGN WITH THICKER WALLS AND LARGER TONE HOLES. IN ADDITION, IT HAS EXTRA LENGTH IN BOTH THE BASS AND WING JOINTS TO PRODUCE AN EVEN GREATER DEPTH OF SOUND AND MORE POWERFUL LOW REGISTER.

Whereas thin wall instruments are flexible and capable of projection through clarity of tone rather than through power.  I would describe the word power as quantity and speed of air used to create volume.  They also have flexibility of pitch (from what I have now experienced) and flexibility of sound.  It's a very different approach to building and playing an instrument.  

As I reflect upon my own playing and use of a thick-wall instrument, I realize now how I landed upon a 601 as my best choice 10 years ago and why I now want something drastically different.  For a young bassoonist who wants a huge sound, the 601 (and any thick wall bassoon) is a total blast to play!  Performing with the Chinook Winds quintet, laying foundation for 4 powerhouse solo players, my 601 was fantastic!  Prior to that, playing in Army bands, free-lancing, graduate school; again, the sheer power available to me was perfection!  I listen back to all my recordings from that time period and I love what I hear.  My sound, my style of playing make sense in context.

Then everything changed...

I had a major back surgery that required my abdomen to be cut vertically for 8 inches.  My recovery was long and my playing as a result has changed.  I feel this in how I generate vibrato across all ranges, how much physical work is required to project into a hall and in the work required to create tapers that can compete with the most nuanced clarinet player.  I also recognize the physical demands required by a thick wall instrument have become more challenging simply because I'm older.  I have battled 4 back surgeries in addition to neck and shoulder issues.  

As I have moved from full-time performance into higher education, I do more solo playing now.  My quintet dynamic has also changed from full-time work with 4 young, powerhouse players.  Now playing in a university faculty quintet means very intermittent periods of rehearsal and performance - some semesters there is almost none.  The change in personalities and playing style has required me to be a very different player.  

Currently, I play principal only with a community orchestra (Idaho Falls Symphony) rather than with salaried/tenured regional orchestras (Great Falls, Billings).  This requires more delicacy and (here it comes) flexibility to blend well and provide what is needed.  I have also been playing second bassoon consistently for 3 seasons now (second to a Heckel 6000) - something I have never done before and an entirely different skill set!

All of this explains why I have easily gravitated towards the thin-wall models during this process.

There is however one caveat.  

In my last blog post, I stated the desire to have an instrument that could handle a huge sound when needed - something I felt the 6000 Heckel I played on couldn't quite deliver (of course I could be wrong).  I hear the greatest potential for this very specific ability in the Yamaha models.  The Moosmann 150E is lovely to play, so easy in the bottom octave, so stable and responsive in the top octave - really impressive!  But I also hear, and have received confirmation from my oboe colleague, that the Moosmann doesn't push out like my Fox does and it was missed in performance.

Now what?

Many thanks to Justin Miller and Midwest Musical Imports, I have been permitted to keep the Yamaha 821 and Moosmann 150EDLX for an extra long trial.  I am taking them to Seattle for a 7-day residency with Trio de Bois and a concert with the Ensign Symphony and Chorus onstage at Benaroya Hall.  This next week will reveal a lot about what these instrument can offer and how they will/will not meet the goals I have set for this process.

In addition, as I have gained even greater clarity and wisdom from this process, I am setting up trials on a few more bassoons before I make a final decision: Fox 460, Puchner 6000, maybe a Fox 680.  I am trying to find a newer Fox 201 and any and all Heckels - both are really hard to come by.  I was on the waitlist for a Benson Bell but, not surprising, it was purchased before it got to me.  

The journey continues!  Be sure to check out my YT channel for more comparison videos of instruments.  


Sunday, February 10, 2019

In the Market for a New Bassoon: First Impressions

First, I have to give a HUGE thank you to everyone who has left comments, sent messages and emails to offer insight, help, even potential instruments for sale as I have shared my videos.  THANK YOU!  I really appreciate the feedback - keep it coming!


A culmination of several events over the past 6 months has pushed me into the market for a new bassoon.  Only about 10 days into the process, I have already learned so much.  I'm always peeking at the cost of bassoons - don't we all?  And who doesn't enjoy the vendor hall play-testing at various conferences?  However, the reality of how much the market has changed since I purchased my Fox 601 in 2009 has been humbling.

Here are my initial thoughts:

  • playing a bassoon for 10 -15 minutes in a vendor hall is not how you trial a bassoon.  It's a good place to start but shouldn't be the singular litmus for a $25,000+ purchase.
  • it's concerning to me how much a person can spend on a fairly mediocre instrument. 
  • this is a highly subjective process filled with colorful adjectives, intangible concepts, and unquantifiable components of value. 
    • enlist the help of people you trust.
  • everyone has an opinion!  This isn't a bad thing.  Absorbing years of experience, wisdom, and insight from others can afford you the data needed to distillate meaningful axioms for the process.
    • it can also help you filter the dearth of well-intentioned, "I love my bassoon, so you should buy the same!"  It's deeply personal for each of us and when we fall in love, we just want others to have that same joy!
The last few days playing a Leitzinger and a Yamaha (videos to come) have allowed me to concisely articulate what I want in a new bassoon:
  • I want an instrument that keeps all the things I love about my current instrument, improve upon the shortcomings I currently struggle with, while not introducing new complications.
The result of this clarity has quickly led me to a better understanding of how and why bassoonists keep inching up their budget.  It is easy to see, at this early point, how bassoons in the $20K-$30K price range are really quite similar.  It becomes more a question of an exchange of challenges rather than a question of wholesale superiority.  

The Leitzinger and Yamaha bassoons are fine instruments but they both have concerning flaws.  They have features that would resolve some of my concerns but new ones I flat-out DO NOT want to deal with whilst breaking in a brand new bassoon.

Which reminds me: for many years I have cautioned students about buying brand new because we all know it will take at least 12 mos for the bassoon to finally start settling and opening up.  Which mean the instrument you try-and-buy will not be the instrument you end up with.  Now, if what you try-and-buy is something you immediately love, rational thought and experience dictate that most likely it will only get better.  Conversely, if there are significant concerns, who knows?  They could get better or they could simply remain. 

Back to me and my needs ("Enough about you, let's talk about me!").

What do I LOVE about my instrument:
  • apparently I love my keywork!  I didn't think it was that important to me but playing on bassoons with a few less keys, rollers, and different placement quickly made me realize that I want those details to remain on a new instrument OR I need to be prepared to pay for custom work after purchase.
    • I did this when I bought my Fox 601 with Keith Bowen and it was money well spent.  Also, really quite affordable to make changes to keywork.  
  • I like the option to play with a HUGE, full sound that doesn't start to split or just cave in on itself.
    • What does that mean?  See comment about adjectives, intangible and unquantifiable aspects of a bassoon.  All I can is that I played a gorgeous 6000 series Heckle this weekend that was absolutely marvelous but was never going to play with the huge sound that I have used on my own instrument especially in chamber and solo performances.
What specifically do I want in a "new" instrument:
  • I want stunning tapers!  No, that's not about my reeds.  My reeds can taper.  I want a taper that doesn't turn me inside out in the process.  The Leitzinger Model II has that taper - WOW!  It keeps the sound spinning without the urge to tragically cut out right before that beautiful moment when sound dissolves into silence - think: clarinet.    I want that!
  • I HAVE TO HAVE a responsive and in-tune (as much as possible) top octave.  The 6000 Heckel I had the great fortune to play this weekend had the free-est, most in tune, responsive top octave I have ever experienced.  There simply was no fight!  They spoke, they were in tune, they moved easily into the next note.
  •  Nuttty core to every note.  Capable of a full tone no matter how short you play.  This is very much the player but also very much the ability of the instrument, in my opinion.  Any master player can make almost any instrument sound pretty awesome.  But I am convinced there are also master instruments that, when paired with a master player, well, *MAGIC.*  I heard it at Meg Quigley from multiple bassoonists.  I heard it from all the teachers with whom I studied.  In my life as a Wild West Bassoonist I don't hear it and likely I'm the one who needs to be creating it for my students and the ensembles in which I perform.  I'm failing them.  
That's my current list of needs from my next instrument.
  • keywork
  • ability to manage a huge sounds
  • stunning tapers
  • brilliant top octave
  • nutty core
Really, is that too much to ask?

This is also way my budget has grown in the past 10 days.  I'm moving from my initial budget of $20K-$30K into the next bracket and wondering: what can $35,000 get me?