My 2012-2017 reedmaking process:
Reed making is a skill that takes many years to develop. Ideally, a student will begin the process of learning how to make reeds when they first begin to play the instrument. There are several basic tools for beginning players and reed-makers that will allow them to exercise a modicum of control over their reeds. These tools are:
- reed forming mandrel
- reed holding mandrel
- black plastic plaque
- needle nose pliers
- ceramic knife

These tools will allow students to take an already handmade reed and make adjustments to the reed throughout the duration of the reed’s playing life. Particulars of beginner reed adjustment will be covered later in this resource.
Reed making is a skill that requires many years in which to develop competence. Even then, for most professional bassoonists, it becomes a dynamic art, subject to change as the player, circumstances, and demands of performance change. There simply does not exist a right or wrong method for making reeds. There are many wonderful resources available to those interested in learning and improving their reed-making skills. Learn from each of them and from any colleague who is willing to share their process.
This resource is for the benefit of my students in sharing what I have learned about reed-making and how I choose to make reeds...at this point. Whenever possible I have included credit to the bassoonist who taught me various principles of reed making. Some principles were taught by multiple mentors and some techniques I have simply forgotten the original author. My personal approach to reed making is designed for speed and quality and to that end, let us begin.
Forming the Tube
Step 1: Cane Selection
Cane selection should be done with consideration for:
- the elevation at which you play most often. You want cane that will perform well and be complementary to your particular elevation
- the thickness of the profile
- the width of the shape
- the hardness of the cane itself
- beware of cheap, brittle, bark-y, green, or soft/mush-y cane
- take note of the cane fibers, the fibers should be tight and smooth but not too glassy
When selecting cane always remember that you get what you pay for: the cheaper the cane the cheaper the quality of the cane. When it comes to selecting cane go for quality and not for price. Saving a few dollars by choosing a cheaper source for cane will cost you when fighting with bad cane in the finishing stages.
My suggested sources of cane for elevations at 3,500 feet or higher are Jone’s Cane or Womble Williams Cane. I use gouged-shaped-profiled cane. While it is important for students to understand the basics of gouging, shaping, and profiling, there are many points in that process wherein the quality of the final product can be compromised. I find it best to purchase gouged-shaped-profiled cane because the supplier has already taken the loss of those variables to produce a product worth selling.
Step 2: Preparing the Cane
Before soaking the cane there are two important steps to prepare the cane:
- Lightly sand the underside of the cane. This sanding will get rid of any small imperfections on the inside of what will be the blade of the reed. It is important to understand that we want the blade and the tube to be a continuous and smooth surface free from obstructions to the vibrations of the reed.
- After lightly sanding the underside of the cane, place the cane on an easel. Depending on your cane selection you may need to define the collar. I like to define the collar before soaking and before the blank has been formed so that the consistency of the collar will be most accurate. Using a flat file, define the edge of the collar to a 90 degree angle but not so much that you create a gouge in the cane of the blade.
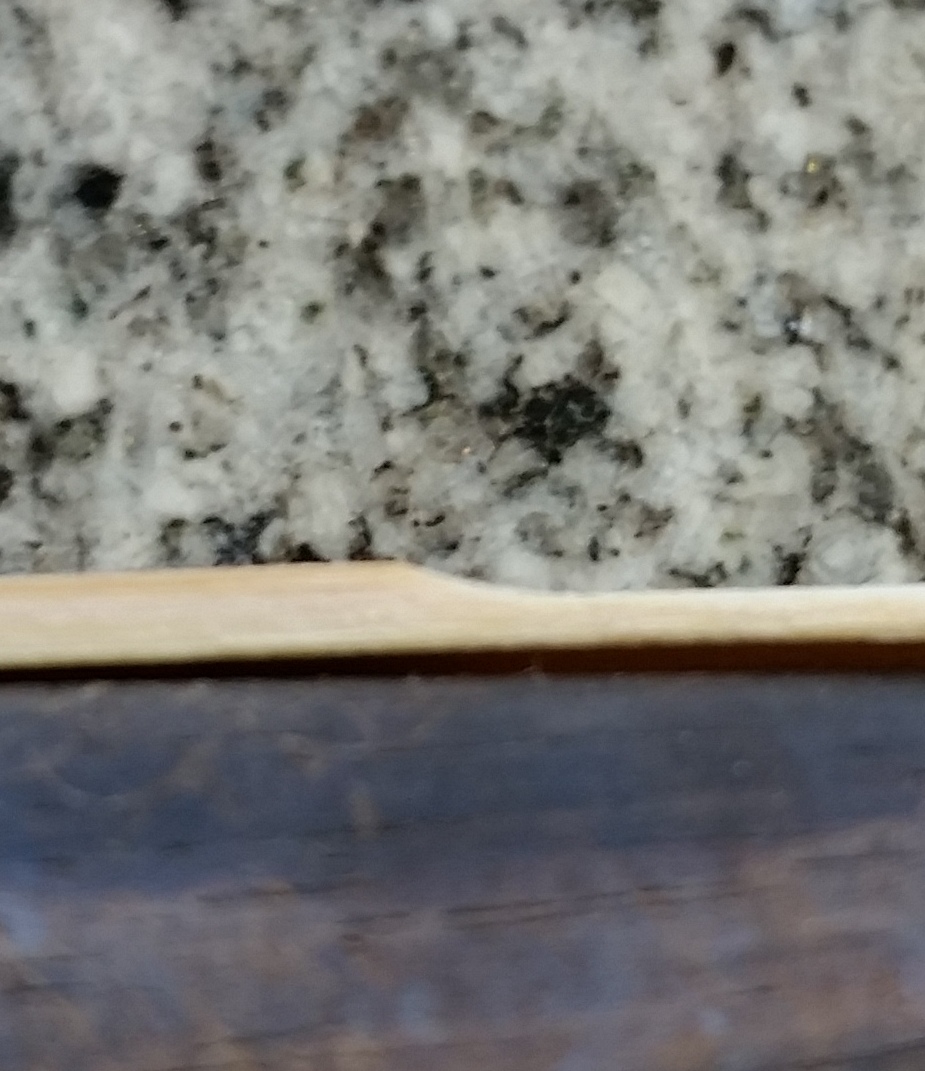 |
| Collar before defining with file. |
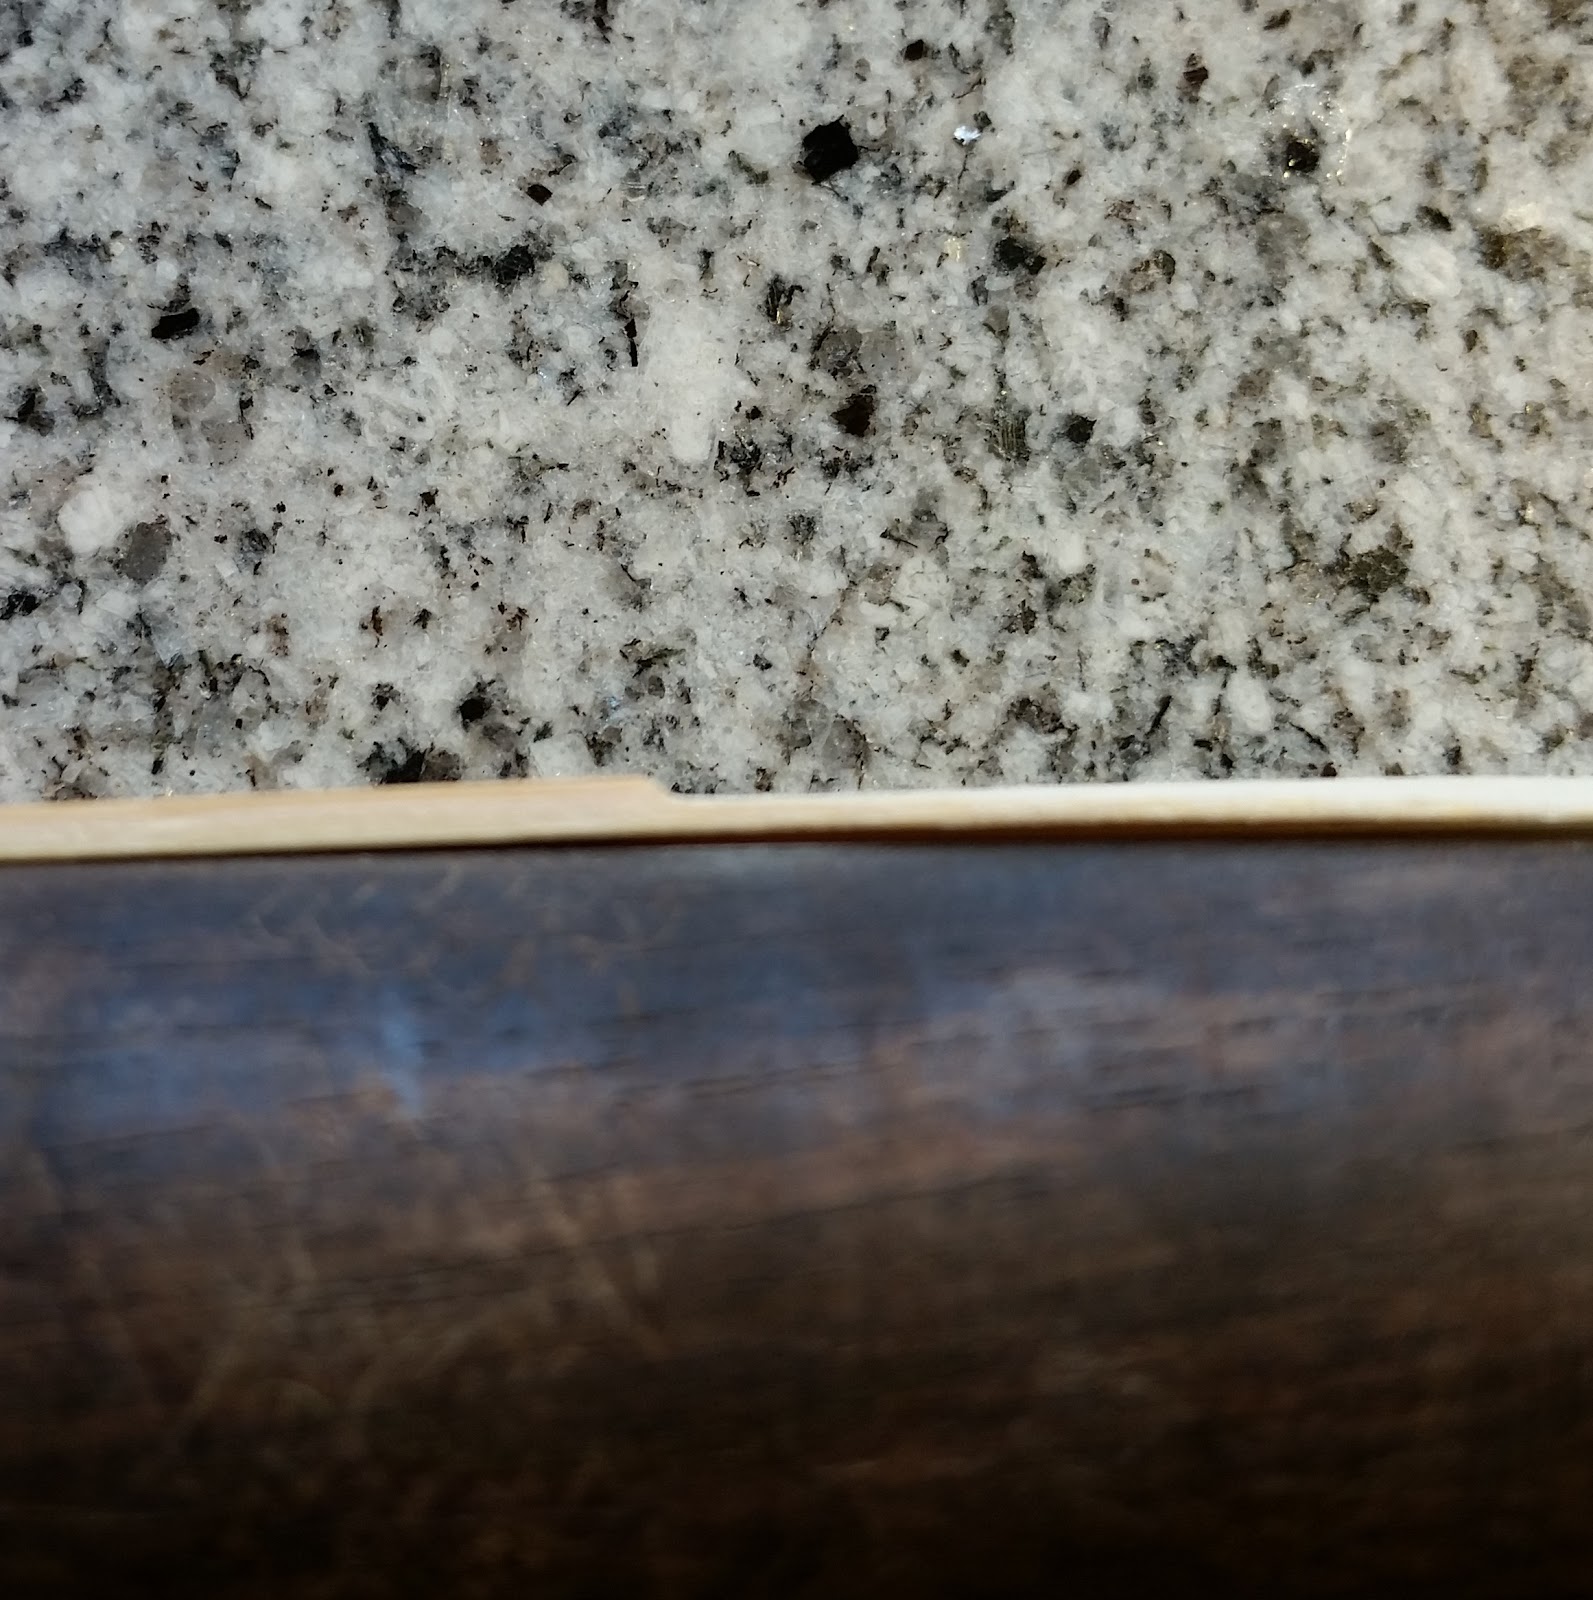 |
| Collar after defining with file. |
 |
| Showing the difference in a defined collar on top and undefined on bottom |
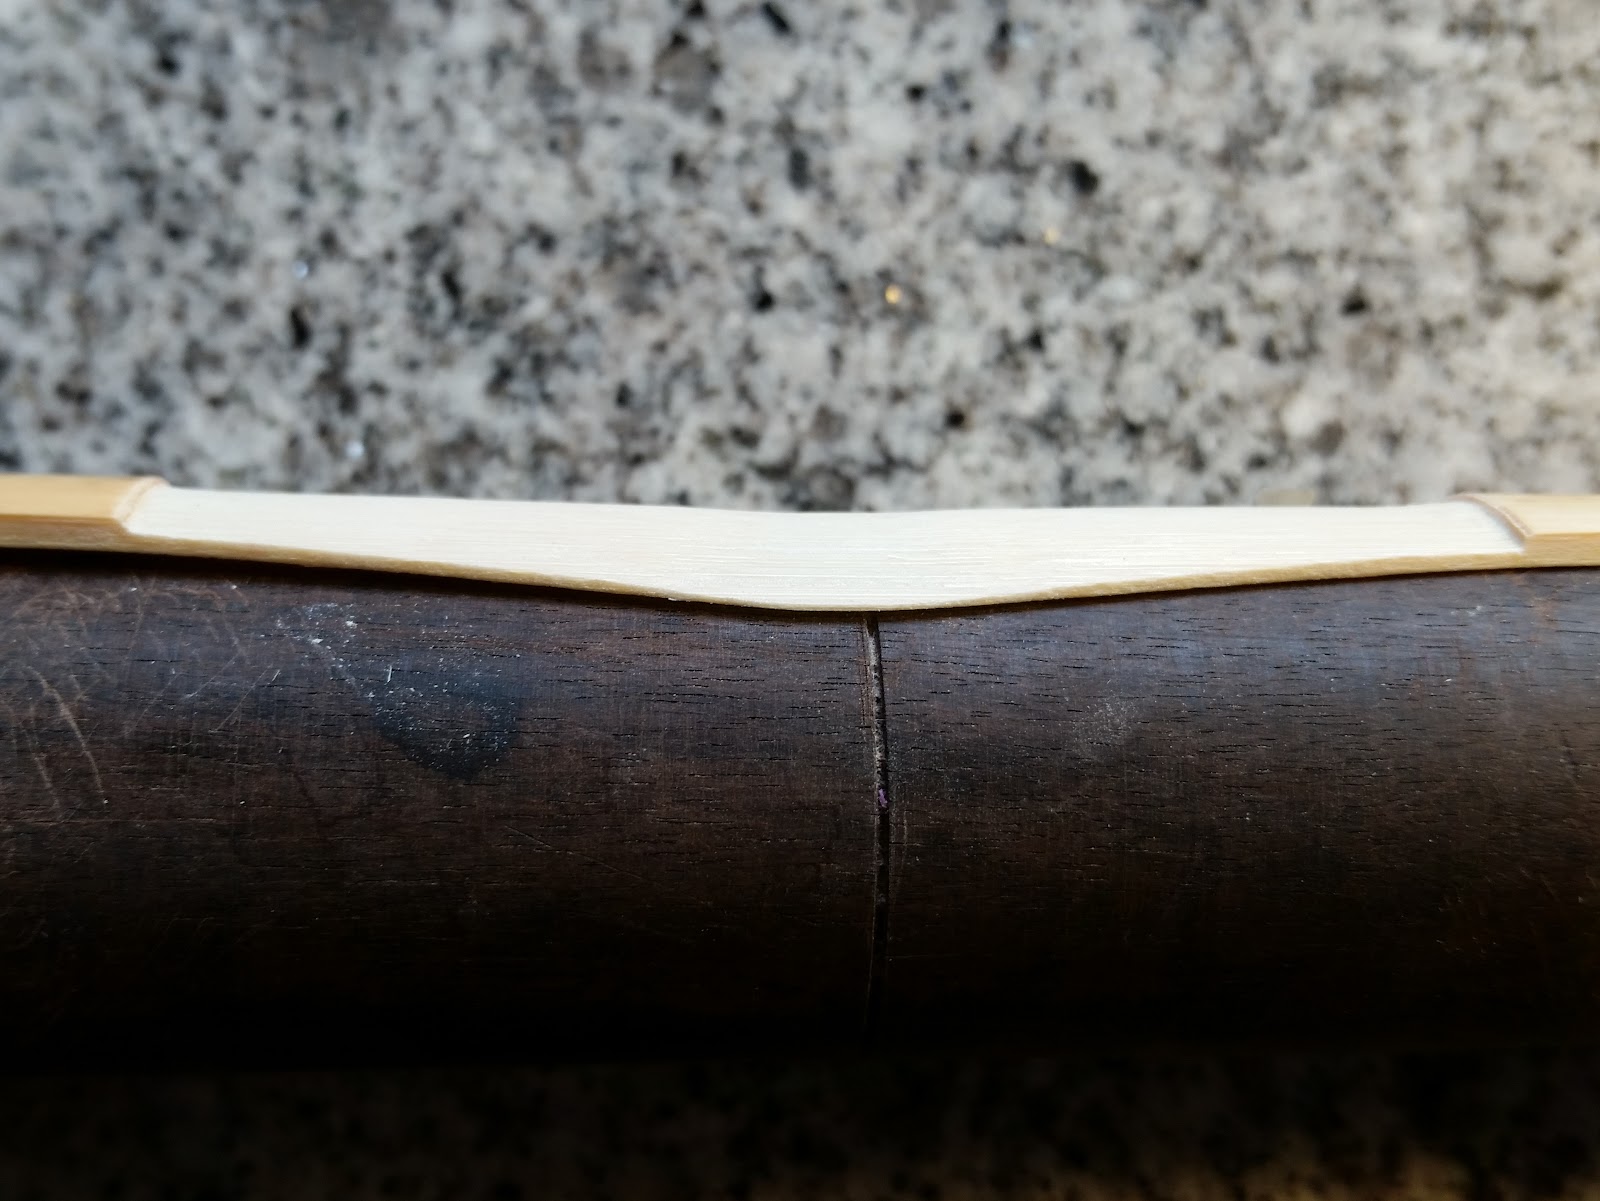 |
| Side view of defined and undefined collar. |
Step 3: Soak the Cane
After you have sanded the cane and defined the collar, now it is time to soak the cane. Soak cane for a minimum of 24 hours and never more than 72 hours. It is acceptable to soak it in hot water which can help speed up the process. You can place the cane into a small crock pot which is useful in speeding the soaking process and in forming the tube. After a proper amount of soaking all the cane should have sunken to the bottom of the container. If you have cane that has not sunken to the bottom within 24 hours, likely, that piece of cane is not going to be the best. However, I would recommend continuing to work with that came after placing a mark on the cane to identify it as potentially inferior.
Step 4: Forming the Tube
This part of making reeds is very traumatic for the cane. Therefore, it is crucial that we help prepare and support the cane so that it will not crack catastrophically. You will want to have a consistent source of hot water. I choose to use a very small crock pot which keeps the water at a perfect temperature. I place the cane into the hot water (crock pot) along with the forming mandrel tips and the elastic strips that I will use to wrap the cane.
Now you are ready to prepare the cane for the forming process. Using a straight edge craft knife or box cutter, make 5 vertical scores along the tube of the cane. As demonstrated in Glickman/Popkin’s “Bassoon Reed Making” pg. 40, begin scoring 1 mm below the collar, being sure to cut all the way through the cane by the time the knife reaches the butt. Begin with a center score and then place two more scores evenly spaced on either side of the center score.
Next, you will need to fold the cane on the center line created by the profile or by finding and lightly cutting a center line with the use of an easel and craft knife. Once you have established a center line for the fold, fold the soaked and scored cane over the flat edge of a knife. After folding it is important to be sure the collars - not the butts - are lined up. The butts can be sanded to match. However, the collar lined up in the forming process will create the best possible reed. If the collars are not lined up, adjust the center line and re-fold. Pinch the tip of the fold once the collars are lined up to maintain the tip and the proper forming of the entire length of the blade.
At this point you are ready to wrap the cane. Holding the folded cane carefully, take a piece of the hot, soaked, braided elastic (the narrower the width of the elastic, the better) and wrap the cane piece starting at the butt and traveling up just past the collar into the base of the blade. Do not wrap with undue force. The elastic will tighten as it dries out around the forming mandrel.
With the cane soaked, scored, folded, and wrapped, you are now ready to perform the most traumatic part of the reed making process: inserting the forming mandrel.
It is absolutely necessary to use heat on the well soaked cane and elastic. With a lighter, heat the mandrel from tip to estimated base of reed. In my opinion, it can’t be too hot. Once it is heated, hold the wrapped cane from side-to-side and begin carefully inserting the tip of the forming mandrel. Slowly push the mandrel into the butt without twisting. It is imperative that you do not twist the mandrel in this step! Twisting the mandrel will twist the cane and it will dry with a permanent twist through the cane, thus rendering it useless. Slowly push the mandrel into the wrapped cane until a slight space develops between the sides of the tubes. At this point, the tube should be visibly rounded.


The best way to form a tube is to insert a forming mandrel and then leave the cane to dry for as long as possible. This means that, ideally, you will not transfer from a forming mandrel to a drying pin. To accomplish this, I highly recommend purchasing a drying rack with removable mandrel tips and a handle to hold and allow transfer of tips without removing the reed. These can be purchased from millerdoublereed.com


Making a Reed Blank
Step 1: Unwrap and Bevel
Hopefully the reeds have been drying for at least six weeks when you move on to making a blank. The reality is that this simply may not be possible. Don’t despair if you have to form blanks from cane that has only dried for a week, and sometimes even less. While it is not ideal, you will still be able to make a reed that will perform for your purposes. Unwrap a piece of the dried cane and enjoy the beauty of the reed at this point - it is quite a thing to reshape a piece of arundo donax! Next you will bevel the tube to allow for a perfectly circular and sealed tube and butt.

Select a small piece of extra fine 220 grit sandpaper. Lightly holding the tube, sand the angles of the entire tube using 15 strokes against the sandpaper on each side. An effective bevel will remove the 45 degree angle of the sides of the tube to create a flat surface for both sides of the cane to come together for a perfect seal with the additional benefit of creating a strong and open tip.


Step 2: Place Top (1st) Wire
Cut three, 3-inch pieces of 21/22 gauge soft brass wire. Place the folded piece of can on a forming mandrel and wrap the top wire, placing into as close to the color as possible without falling over the edge of the collar. The first wire will move down throughout the reed making process. To help with this, I have recently been adding a file groove for the wire to sit in. I have had great success with it keeping the wire in the exact spot I want it for the life of the reed.


Without over tightening, keep moving into back into place. The 1st wire in conjunction with the collar is the first point on the reed at which we begin to refine the vibrations. We want the first wire to hold the tube without constricting vibration. It is perfectly acceptable to tighten the first wire on to the point at which there is still slight play when you wiggle it.


You may have discovered after unwrapping your cane a small crack traveling into the blade from the center score. Now that you can placed the 1st wire, you can use your flat file to gently sand away that crack and blending up into the blade. If a crack has formed, it will be very minor and will disappear after only a few strokes with the flat file. Do not over-file at this point.


Step 3: Place Middle (2nd) and Bottom (3rd) Wire
I place the bottom wire next. Wrap the wire on the same side as the top wire, placing it 3.5 mm from the butt of the reed.
Lastly, wrap the middle wire 10mm from the collar. Do not measure from the top wire. Remember that the first vibration fulcrum is the collar, not the top wire. The top wire is merely a support for the tube which is capable of changing the tip opening.


Step 4: Tightening Wires
Now comes the real fun in finishing the forming of a perfect tube. Begin tightening wires from the bottom to the top. Your bottom wire will be the tightest, the top will be the loosest. You may discover additional cracks traveling into the blade. File them away as they appear. Also, move the reed up on the forming mandrel to allow for a very tight seal via the bottom wire. At this point, you may also elect to crimp the tube using your needle nose pliers but only from the butt to the 2nd wire. Do not crimp between the 1st and 2nd wires at this point.

Step 5: Ream the Butt
At this point you will want to check the bocal fit. You want it to be tight thus allowing you the space to ream with a spiral and then a fine, diamond reamer. It is preferable to do this when the reed is still dry but not beyond comprehension to do this again when the reed might be damp. After reaming with the spiral and diamond reamers (I recommend the Rieger reamers) you can go further, with more refinement, to remove any debris from the tube using a round needle file. After reaming, be sure to check bocal fit again and tighten the bottom wire as needed. Finally, sand the butt across if you need to even up the sides of the butt end. At the end of this step, you should have a perfectly rounded and sealed butt.
Step 6: The Wrap
There are many different ways to wrap the blank: heat-shrink tubing, nylon thread, various epoxies, etc. Some bassoonists feel very strongly about the acoustic implications of what you place on the reed. I have no preference with regard to this and have not found differences in my own choices. I encourage you to be creative and have fun with this step. Just be sure that it is functioning as an adhesive and seal to keep the reed together and supported. If possible, do this step to allow you continued access to the bottom wire.
Currently, I wrap with two strands of variegated nylon thread. I place Duco cement around the bottom wire with the wire twist still sticking out. I then apply the thread finishing the wrap at the second wire and covering with a coating of Duco cement. Once the cement has dried, cut the tails of the thread, and bend down the wire twists.
Step 7: Cut the Tip
With the read wrapped, wires tightened and bent down, bocal fit established, and tube fully formed, you can now soak the reed in preparation for cutting the tip. It is best to cut the tip after the reed has been soaked. However, I have clipped a dry tip many times without negative consequences that I was aware of. There is clearly a risk of chipping or cracking a dry tip but it has never happened to me.
Choosing the length at which you clip the tip is strictly a matter of trial and error. The length of the reed in proportion to the length of the blade will determine the pitch of the reed. I strongly oppose cutting the tip more than once. For example, I would never cut the tip, begin finishing the blank, decide the pitch was wrong and then clip the tip again.
It is my opinion that you must commit to a length, finish the blank, and then determine if the next reed should be a different length. Please refer to other sources about the finer points regarding the proportions of blade and reed length.
The best way to cut a tip is with a guillotine. This tool ensure a straight and perfectly measured length with consistency from reed to reed. It is my opinion that using a cutting block and knife is wildly inconsistent and destined for error.
When cutting the tip it is imperative to measure the desired blade length from your top wire not your collar. This is a common mistake, to measure from the collar, and results in reeds that are misproportioned with resulting consequences. While the collar is the first vibration fulcrum, the top wire is the base of the blade and will have the greatest impact on the tip opening. Thus, the tip cut should be made with regard to the placement of the wire and not the collar.
For my current set-up, I cut my blade by placing my top wire between the 25 - 26 mm markings on the guillotine.

One final point about cutting the tip and setting the pitch of the reed. There exists a common misconception that bassoons can adjust their tuning by raising or lowering the bocal. In my experience, it is my absolutely firm opinion that this practice is completely useless. The only way to affect pitch is to build a reed that is in tune. This is done with the length of the reed and further affected in the finishing process. If a bassoonist is out of tune, I believe strongly it is a flaw in the reed which can only be overcome by using a properly pitched reed.
After clipping the tip, you can now sit back and enjoy the lovely blank you have formed.

… but don’t celebrate too long because your next step is…

Finishing the Blank
Step 1: Knives vs. Files

My very first teacher, Kenneth Moses, taught me to finish reeds using a knife. While I was always confident about my knife technique I was never very confident about sharpening the knife. In fact, I would often bother my oboe colleagues to sharpen mine for me. Despite much instruction on sharpening my knife, I was very happy to learn how to use files in the finishing of a blank. My file technique is an amalgam of techniques taught to me by Charlie Bailey ( via his teacher Ben Kamins) and my much beloved mentor, Lori Wike. All of my teachers used files to some extent but Charlie and Lori used them more often than a knife.
As I have previously stated, my approach to reed making is driven by speed and quality. Several years ago I was introduced to the Kyocera ceramic knife which requires no sharpening. It can be purchased here: http://www.millermarketingco.com/kyocera/ I have been very pleased with my Kyocera knife which I keep in a sheath to avoid chipping the blade. The angle required to use it is different from the angle you would create with sharpening against a stone. However, the sharpness is the same if not better than what I would achieve with sharpening a traditional knife. The Kyocera knife is extremely affordable and saves an abundance of time because it does not require constant sharpening. I am still using the first one I purchased over 3 years ago.
Step 2: Finishing the Tip
Whichever tool you chose, the approach to finishing the blank will be the same. At this point it is important to understand some fundamental principles of reed anatomy and function as I will be referring to them throughout the rest of this resource.

Tip - this area runs the entire width of the end of the blade. The tip will determine the overall response of the reed.
Corners - the corners exist within the area created by forming 45’-angles from the center of the tip out to the rails. By thinning the corners within these angles you create an arrowhead shape. The corners will create strength at the type which aids in stability of pitch and response. Taking out too much cane at the corners will create a misshapen tip opening, an unbalanced reed from rail-to-rail, and compromise pitch and strength.
Crescent/Thumbnail Shape - this is often referred to in many reed making sources and refers to the shape that is created by thinning the tip and corners. The goal is not to create this shape but rather to recognize the manifestation of the shape from proper thinning of all areas of the tip. I no longer use a crescent shape in my reeds.
Spine - the spine runs up the center of the reed and controls the power, pitch, stability, and bottom octave.
Channels - this is the area between the spine and the rails. It’s actually wider than what the diagram demonstrates but gives you the idea of where it exists. The channels will affect the bottom octave and the power of the reed.
Heart - this is the sweet spot at the top of the spine and in between the angles of the corners. This area will affect the pitch and overall response.
Rails - This is the edge of the cane running up the length of the blade. The strength and power of your lowest register comes from this area. The rails should thin gradually from collar to tip. Removing the rails at the collar will compromise the entire reed.


I always begin the finishing of a blank by thinning the entire tip using a flat-needle-file. Placing the blank on the mandrel and supporting the blade, you can use a flat-needle-file to thin the tip by making horizontal strokes with half of the file running on the plaque and the other half on the cane. Using this technique will allow you to file more quickly without risk of snagging the tip of the reed. I file the tip down to ≈ .015 mm measured on a dial indicator or micrometer.


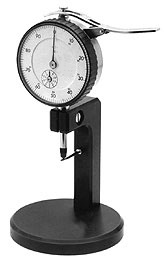
Allow me to expound on the incredible power of consistently using a dial indicator.
The dial indicator is used to measure the thickness of cane. I use a dial that measures in 0.01 mm. Consistently using a dial indicator, especially as an inexperienced reed maker, will allow you to quantifiably track removal of cane in a manner that creates a continuous and steady taper of the reed from the collar to the tip and with balance from spine to both rails. My reed notebooks are filled with dial indicator measurements from years of meticulous measuring using a dial indicator. I believe that the time I spent drawing reed diagrams and recording measurements allowed me the opportunity to gain an innate understanding of the importance of a well balanced and consistently tapered reed. It is my theory that a reed which achieves a “perfect” taper and excellent balance will be a wonderful reed - without exception. The variables that prevent that from occurring typically happen when we use poor knife technique or remove cane, using any tool, in a disproportionate manner. The power of the dial indicator is that it removes the guesswork. You can see with absolute precision exactly what is happening to the thickness of the reed.


Once you have thinned the tip to ≈ .015 mm you should be able to crow the reed immediately resulting in the first tone of the crow.
Step 3: Using the “Crow” in Reed Finishing
I am always amazed at how many bassoonists crow their reeds without any understanding of why they are doing it. The crow is not just a funny sound effect! The crow tells you an incredible amount of information about your reed without even placing the reed on your bocal. A full crow is made up of three distinct tones. Each tone relates to a specific aspect of the reed.
- Top Crow: this is the first tone and the highest pitch. It is created by blowing through the reed with the least amount of reed in your mouth. The top crow will indicate overall response of the reed, pitch, and the success of your top octave. One must be very careful with the tip because you want it thin enough to give you immediate response but heavy enough to create adequate resistance for your top octave. I have found that the best thickness for a tip is between 0.020 and 0.010 mm. Many bassoonists have written about specific pitches the crow should be at. In general, the lower the crow, the lower the pitch of the reed and vice versa. After years of crowing you will know immediately if your crow is too low or too high.
- Middle Crow: this is the second tone and the middle pitch of the three crows. It sounds simultaneously with the top tone and is created by taking in more of the reed but slightly less than the amount you would play on. This crow relates to the stability of the reed and response of the midrange of the instrument. If you cannot obtain the middle crow, the top ⅓ of the blade is likely too heavy and simply needs to be thinned all the way across the reed and all the way off the tip of the reed. This involves the heart of reed which, when removed in excess, will cause the reed to go flat. Removing the perfect amount of cane in this area will ensure the right pitch and clarity of your tenor range.
- Bottom Crow (or 3rd Crow): this is the third tone in the crow, the lowest of the three tones, played simultaneously with the top and middle tones, and created by placing the reed all the way into your mouth up to and even on the collar. It is sometimes necessary to tip the butt down to get the third crow. This crow most specifically will tell you about the response of your bottom octave. If this crow doesn’t sound, you need to remove cane on the bottom ⅓ of the reed, being very careful to avoid removing cane from the rails. Keep in mind that in my process of making reeds, I have already removed cane in this area when I defined and blended at the collar and when I removed and blended any superficial cracks during the forming of the tube.
Using this knowledge of the crow, you can accomplish a lot very quickly in the finishing process.
Step 4: Blending the Tip
After thinning the tip and achieving the sounding of the first tone of the crow, it’s time to start blending the tip towards the corners. Keep in mind that your reed should not contain ridges or steps from one part to another. You want a continuous taper to create a smooth and stable tone. Thus, your next step is to blend the tip towards the corners. I continue to use my flat-needle-file, placed at a 45’ angle, I file out towards the corners. When blending into the corners don’t simply thin the corners. Thinning the corners specifically will make a center heavy reed and create an unbalanced aperture - reed tip opening - that has weak sides and a heavy center. As with the rest of the reed, you want the aperture to have a balanced closing such that as you pinch the aperture it closes evenly without collapsing at the sides before closing in the center.


As you blend towards the corners start close enough to the heart that you are removing cane from the outsides of the heart area. As you refer to my reed diagram, you will see that the corners extend down the rails and towards the tip center and includes a rather large area. Effectively blending towards the corner should create the second tone of your crow. After working the angles to blend the tip towards the corners, if your second crow tone is resistant I recommend thinning the whole top ⅓ of the reed. Using the flat-needle-file, file the reed in three sections: left, center, right. Do each area twice (on both sides) and check your crow. Because you will be removing cane from the heart, you will want to be conservative with this step; checking the crow after removing two strokes from each section.
Step 4: Blending the Entire Blade
With the top and middle tones of the crow sounding, your work is largely done. You may discover that the bottom tone sounds with the second crow but likely with some resistance depending on how much cane you removed with the collar definition and the superficial cracks. At this point I blend the entire blade, once again divided into three main sections: left side, center, right side. Using the flat file I make two strokes from the collar and go off the tip in each section, on both sides. I avoid the rails as much as possible while doing this. Again, the rails give the reed power and stability. A reed that projects with ease in a large concert hall will have obvious rails with a gentle taper towards the tip.
Step 5: Final Steps
In an ideal situation, this final blending will result in a reed that is ready to take into rehearsals and practice sessions. Of course, this is rarely case and this is the point at which experience, practice, and problem solving become critical. Here are some general final steps to try when getting the reed to performance perfection:
- Let the reed break in. Don’t be in a rush with a reed. Practice on it for several hours, removing cane only as needed and keeping in mind that your are dealing with fibers that have undergone significant stress. Those fibers need time to adjust and settle.
- To refine the vibrations, it is at this point that I will revisit the wires and do some crimping of the tube between the 1st and 2nd wires to further round the tube without pinching the top of the tube. Your goal is to have a tube that is straight and round, the tube should run parallel without taper until the collar. At the collar the reed should have a consistent taper toward the tip. Keep the top wire such that it has the slightest bit of “play” when you wiggle it.
- After rounding the wires you may find the aperture has become much too open, causing the reed to sound “thuddy” in response. Using your fingers, gently squeeze the blade from top to bottom to help close the tip without flattening the top wire.
- You may discover that the reed seems to respond quite well, with proper pitch, and a responsive top octave but experience substantial resistance in your bottom octave. Now you should pinch the 2nd wire from top to bottom. This will open the aperture slightly, lower the pitch, and also make your bottom octave pop with ease. I have found that after the initial wire adjustments, throughout the life of the reed, I will make more adjustments to the 2nd wire than the top wire.
- As you practice on a new reed, you may find that the reed tends to harden. This is normal and is easily fixed by removing and blending the whole reed with a few strokes each day - but of course avoiding the rails!
- Finally, you will often find that the reed is always in need of better response. Return to the tip and the horizontal thinning of the entire tip. If need be, switch from the file to the knife to achieve the precision thinning you need without losing power in your top octave.
After following all the steps outlined in this resource, you should have an excellent reed. Of course, there are MANY variables and each step in this process that always complicate the reed making process. It is only with time and much practice that you will gain the expert technique needed to make high quality reeds with great consistency. Even then, you will still have reeds that simply don’t respond the way you desire. I find it best not to become too emotionally attached or too time invested in one reed. Reeds can sit for months and even years, there is no rush and no need to abuse a reed that isn’t responding. Simply let it sit for as long as you can. Move on to another reed and allow it to reveal itself to you. Don’t force a reed to be a certain way, remove the cane and see what it becomes.
It is best to have several reeds, each different in some way, that you can rotate between, thus maximizing their playing life and the context in which they are used. Much can be said after 20 years of reed making in my career. But it is a personal journey for each reed maker. Learn from the many resources available and then make reeds, and more reeds, and then even more. When in doubt, make more reeds! You will find a process that works for you and it will be different from everyone else.
Nice blog! Good luck in your new job!
ReplyDeleteChuck Ullery, St. Paul
Chuck - just saw your comment! Thank you! Really enjoying the gig here in Rexburg. Couldn't ask for nicer musicians to work with and sweeter students to teach.
Delete